Scenario Framework Explained
In this guide, I will to explain how to build a basic scenario without scripting.
::Disclaimer:: This is all from my own experience in digging through the combat ops scenario and testing, none of this info is offical or fact checked :)
The first part is more theoretical and afterwards we will create a small scenario to use some of the components. I can advise you to have the workbench open and test some stuff while reading the theoretical part to make it less boring.
General Workbench layout
This guide requires some knowledge of the UI components in the workbench.
World screen
Shows the world. You can move with wasd when holding right mouse on the window.
Resource browser
Small window in the bottom center of the screen. This windows will display all available entities that can be placed in the world. The search bar can be used to quickly find items. It can be useful to filter the items displayed to only show entity prefabs. This can be done by selecting Prefabs with the filter button on the upper righthand side of the window. When an item is dragged onto the world screen it will be added to the hierarchy window.
Hierarchy window
The window on the left side of the screen. In this window a list of entities that exist in the world will be shown. When an item is selected it will show the entity in the object properties window.
Object properties window
This screen will show the properties of the selected entity. Some entities contain different components, which will be listed in the upper half of the window. These can each be selected to show and edit their respective properties.
Scenario Setup
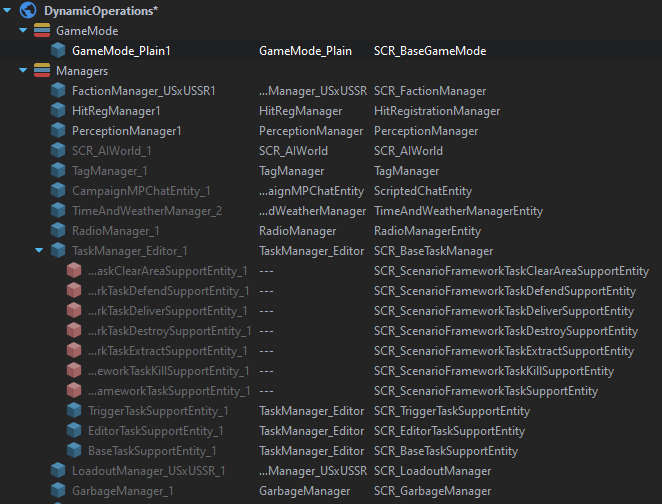
There’s already a lot of guides and videos on how to set up a scenario so I won’t add that here. Basically you want to end up with something like this.
Important!! For specific objectives to work you need to have the correct SCR_ScenarioFramework***SupportEntity as a child to the taskmanager. Some are added be default, others can be added by clicking the Create button at the bottom of the Hierarchy window and adding them to the world. Then you can drag them onto the taskmanager to make them children.
When these Support Entities are added they enable you to use those specific tasks in the scenario.
Scenario Framework Hierarchy
For the scenario framework to do its thing the hierarchy of the different entities is very important.
Area (Area.et)
This is at the top of the hierarchy. This is where the framework starts generating. As seen in the Combat Ops - Arland scenario these are mostly divided by the different locations on the map. As far as I know it doesn’t matter how many areas you have, as long as you have one the framework will work. The area will have Layers under it in the hierarchy as children.
Object properties
Let’s look at the object properties of the area for a second. If you select the area in the hierarchy window, the object properties window will be filled. The GenericEntity and Hierarchy objects are not really important to us. The SCR_ScenarioFrameworkArea object is. If you open that you will be met with the properties of that object. There is 1 really important property that is of interest to us.
That is the Children property. This property enables you to control what children (layers) of the area will be activated. There are several different options. Most relevant are ALL (enable all children) and RANDOM ONE (enable one random child). If you want to make your scenario more random and replayable, this is the simplest way to do so. When you start adding layers, every layer can also have this setting to make even more randomness.
Layer (Layer.et)
This is one of the most powerful entities that you will use, because it will provide you with a way to lay out the scenario precisely how you want it. Later on in this guide you will see how this can be used to your advantage. When you create a layer you have to drag it into an area to make the layer a child of the area in the hierarchy. Any layer that does not have an area as a parent will not be activated. It is smart to rename your layer to something more recognizable than Layer_1 to keep track of different layers in your project. This can be done by selecting it in the hierarchy, right clicking and selecting rename, by pressing F2 when selected, or by renaming the object in the top right of the Object Properties window.
Object properties
When you open the object properties of the SCR_ScenarioFrameworkLayerBase, you will see some properties that are relevant to creating scenarios. The Children property can be used in the same way as on the area entities. The Activation property is also very important.
This is defaulted to SAME_AS_PARENT. This means it will be activated at the same time the parent is activated. The default behaviour of the current parent, an area, is ON_INIT. That means the area will be activated as soon as the game starts. After the area is activated, this layer will consequently also be activated. The most relevant options in the drop-down are SAME_AS_PARENT and ON_TRIGGER_ACTIVATION. ON_TRIGGER_ACTIVATIONcan be used to activate a layer later in the game, for instance when another task is completed, or a player enters a specific location on the map. This can be used to make the scenario react to player actions during play.
Slot
This is at the bottom of the Scenario Framework Hierarchy. When created they have to be dragged into the layer to be recognized by the framework. Slots are mainly used to spawn objects, either in a task setting (vehicle to destroy) or just to create any entity on the fly (vehicle, AI group (using the SlotAI.et prefab), buildings). Combined with the layer on trigger activation this can be used to spawn items or enemies when something specific happens.
Object properties
When you open the object properties of the SCR_ScenarioFrameworkSlotBase, the most important property will be the Asset property. Here you can select the object that will be spawned on the slot. This can be any prefab in the game. You can also use an existing asset by checking the box. Then you have to manually create an object of that type and place it close to the location of the slot. You can use this functionality when you want to make alterations to the object. By default the standard prefab will be spawned.
Creating a scenario with tasks
The Prefabs we’ve just discussed were only the base versions of the layer and slot. To create tasks you can use the different types of layers. These are the Layer task prefab that exist right now:
- LayerTask
- LayerTaskClearArea
- LayerTaskDefend
- LayerTaskDeliver
- LayerTaskDestroy
- LayerTaskKill
- LayerTaskMove
Some of these layers come with their own corresponding slots that provide the object for that task.
- SlotDefend
- SlotDelivery
- SlotDestroy
- SlotExtraction
- SlotKill
- SlotMoveTo
- SlotPick
- SlotTrigger
- SlotTriggerClearArea
Workshop (DIY)
Let’s try to create a small simple scenario using the Scenario Framework components. The scenario will consist of spawning at a location, moving to a designated location, blowing up a vehicle, and extracting.
Setup
For testing purposes you can pick a piece of land that’s flat and easy to navigate, to make testing easier. Put down a spawnpoint US and USSR, to make sure you can spawn close to the mission location.
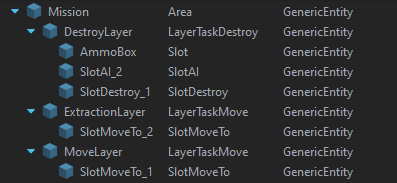
First we create an area, we can call it Mission.
Then we can create the first task, Move.
First task: Move
Drag a LayerTaskMove prefab into the world close to the spawn point, name it MoveLayer. Make sure it is a child of Mission. The activation type should be set to SAME_AS_PARENT. That way it is enabled when the mission is started. In the properties windows it is also possible to change the title and description of the task.
Drag a SlotMoveTo prefab into the world and make sure it is a child of MoveLayer in the hierarchy window. This slot contains a trigger that will complete the layertask when a player enters the radius. In the properties of SCR_ScenarioFrameworkSlotTrigger you can edit the radius, and the percentage of players that are needed in the radius to trigger the task. For now we will only enable Once and leave the rest as default. We will however tick the box Show Debug Shapes During Runtime. This will enable the purple orb while playing the game, and will make it easier to test your scenario.
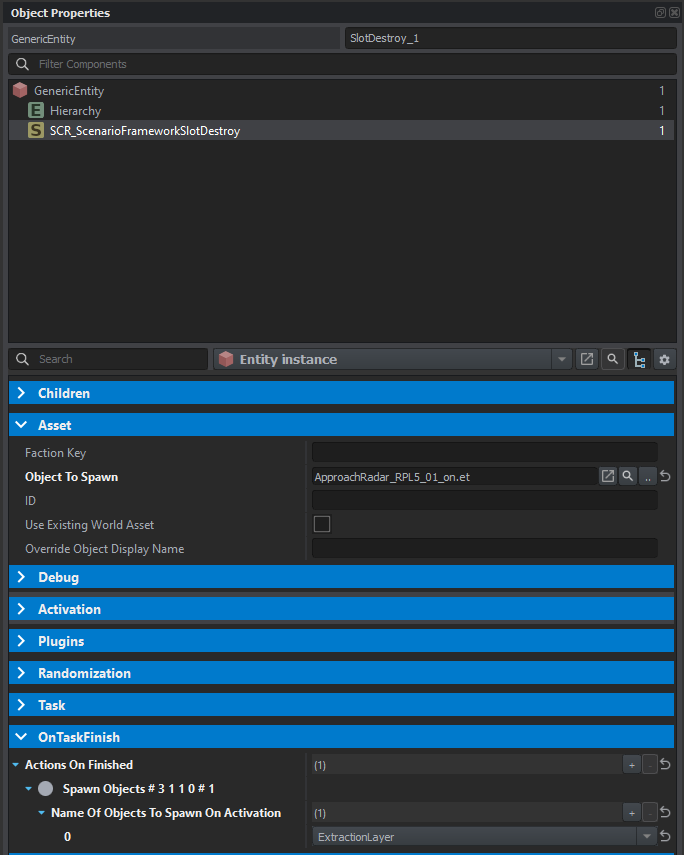
Now for the important part. In the Object Properties window, there is a property OnTaskFinished. Add an action and select Spawn Objects. Open the action and add an object to spawn. In the text box, enter the name DestroyLayer. This will refer to the layer we will be creating in the next step. Setting this property will make sure the selected layer is spawned when this task is finished.
Second task: Destroy
Drag a LayerTaskDestroy prefab into the world and name it DestroyLayer. Make sure it is a child of Mission. In the object properties set the activation type to ON_TRIGGER_ACTIVATION. This will make sure the task will only be activated once another trigger has happened. We have already set up the move task to trigger the activation of this layer.
Now we will do the same thing for the third task. As soon as the vehicle is destroyed, we want the extraction layer to be activated.
Therefore we add a trigger action to the OnTaskFinished. There we once again add a Spawn Objects action and enter the name Extractionlayer.
Drag a SlotDestroy prefab into the world and once again make sure it is a child of DestroyLayer. In the properties we can select the object that we want to be spawned. For this example we will spawn a ApproachRadar_RPL5_01_on.et. You can find it under Prefabs/Structures/Military/Radar or use the search box. When an item is selected, a preview of the object will be shown in the world screen.
To make sure the players have explosives to destroy the vehicle we can spawn an ammunition crate nearby.
Drag a regular slot prefab into the world close to the SlotDestroy entity and make sure it is a child of DestroyLayer. As the object to spawn, select AmmoBoxArsenal_Launcher_USSR.et. Now when the layer is activated, this explosive box will be placed.
Third task: Extract
Drag a LayerTaskMove prefab into the world, name it Extractionlayer. Make sure it is a child of Mission. In the object properties set the activation type to ON_TRIGGER_ACTIVATION.
Now finally, drag a SlotMoveTo into the world and make sure it is a child of ExtractionLayer. On this slot, we will also add an OnTaskFinished action. But this time we will select End Mission. We can select type of end screen we see by enabling Override Game Over Type and selecting a game over type from the list. This will change the text on the screen when the mission ends. You can select COMBATPATROL_VICTORY for now. We will also enable Show Debug Shapes During Runtime to make testing easier.
Testing the scenario
When you spawn you should see the move objective in your journal. When you move to the location the task should be completed and the destroy task (along with the vehicle and ammobox) should be spawned. When the vehicle is destroyed, the extraction task should spawn. And when you enter the extraction location, the mission should end.
If it’s not working make sure you didn’t forget something and that all the layers and slots are nested properly. it should look something like this:
If it’s working you can try to add enemies guarding the vehicle to the mission. Use a SlotAI.et to add them.
A more detailed guide to adding enemies is in here, but I know you can figure it out by now! Try it first.
Are you sure you want to see the guide?
This is not much different than the ammobox we spawned near the car. First drag a SlotAI.et into the world near the destroy slot. Set an enemy group as the object to spawn, for instance Group_USSR_SentryTeam.et. If you drag the slot into the DestroyLayer in the hierarchy window, it will be activated along with the vehicle and the ammobox. That's it! Isn't it easy? :)
Did you work it out? Good job!
Now try adding some other creative ideas to your scenario. For instance:
- Spawn enemies reacting to the object being destroyed
- Using the Children
RANDOM ONEproperty to create multiple different possible extraction points - try to figure out some other tasks not in this guide
Hint You can open the Combat Ops - Arland scenario by opening the world editor and opening ArmaReforger/worlds/MP/Coop_CombatOps_Arland.ent. There is a lot to be learned from studying the way BI does things in that scenario. If you have any further questions about making missions you can visit the Arma discord and specifically Enfusion Mission Makers
Hopefully this has been a helpful guide and you’ll be able to create some cool scenarios!
Please send me a message on discord if you have any questions, comments, or suggestions about this guide.


